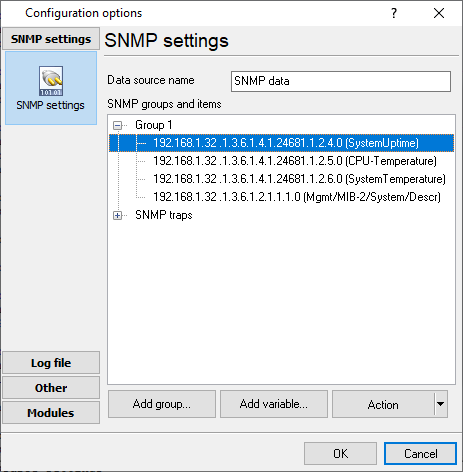
Fig. 2.5.1 Group and variable tree
You can see the group and variable tree in fig. 1. The program uses this information to query data. You can create any number of groups and any number of variables in each group. Note that you should add groups and variables with names that are not in the list yet.
Data source name – the name shown in the program. The name must be unique; otherwise, you will not be able to save the settings. Specify any number of ASCII characters in this field. The default is Data source #<Number>.
Group and variable tree – the tree contains groups with variables included in them which the program operates. The tree is empty by default.
Action – actions with the group and variable tree. A click on this button opens the menu shown in fig. 2.5.2 (a similar menu will appear if you right-click the tree).
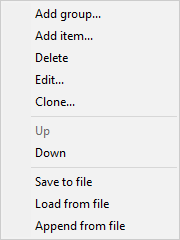
Fig. 2.5.2 Actions with groups and variables
Add group... – add a new group. If you select this item, you will see the dialog box with the default group properties. Fill out the necessary fields in this dialog box and click "OK". If a group with this name already exists, you will see a warning on the screen and will not be able to save the group.
Add variable... – add a new variable to the current group. If you select this item, you will see the dialog box with the default item properties. Specify the necessary values in this dialog box and click "OK." If the new variable is unique, it will be saved and appear in the tree. Otherwise, you will see a warning on the screen, and you will not be able to save the variable.
Delete – delete the current group of variables. If you select a group or several groups, you will see the deletion confirmation dialog box on the screen. If you click "Yes," the selected groups, together with variables included in them, will be permanently deleted. If you select one or several variables, you will also see the deletion confirmation dialog box on the screen.
Edit... – edit the selected group or item (variable). Depending on what is currently selected in the tree, you will see the Group properties or Item properties dialog box. After you edit the necessary fields, click "OK," and the properties will be saved.
Clone... – copy the selected variable (item). You will see the same item properties dialog box as in the edit mode.
Info... – show information about the selected group or variable. If you select this item, you will see the same dialog box as the "Add group" or "Add item" dialog box. However, you will not be able to edit any of the fields. It is used to view the properties and to protect them against accidental change. It is unavailable if the tree is empty.
Up – move the current group or variable one position up. It is unavailable if the current group or variable is at the beginning.
Down – move the current group or variable one position down. It is unavailable if the current group or variable is at the end.
Note: The program checks if this variable exists on the server when you launch the program. If the variable does not exist, it will be marked in the tree with the help of a red exclamation mark.