UDP vs. TCP
The most commonly used network protocols today are TCP (Transport Control Protocol) and UDP (User Datagram Protocol). TCP is a proven and reliable protocol, and probably the most widely implemented protocol in use on IP networks today. However, TCP has a lot of overhead and payload issues, and can sometimes be ‘too-reliable’ or robust for many applications. In fact, when used as transport, for many serial-based applications TCP can hinder reliable communications. In contrast, UDP is a much simpler protocol and is being used more frequently today - particularly in areas where bandwidth or throughput is constrained. An example is the predominant use of UDP for transport of wireless data applications.
UDP is first a connectionless protocol. Like TCP, UDP runs on top of IP networks. But unlike TCP, UDP does little to help with transport delivery or error recovery. Instead, it offers a direct way to send and receive packets, letting the software application manage things like error recovery and data retransmission. Once primarily used for broadcasting small messages, UDP is now used for everything from browsers to Instant Messaging, Video, and Voice over IP applications.
While a powerful tool, the downside to using UDP is that there is not ‘connection’ report to know that you have end-to-end connectivity. This often makes detecting whether or not a packet is ‘making it’ from one place to another quite a hassle.
Client vs Server
Data Logger Suite can be configured to log data from as many ports that you like simultaneously on a single computer. The program allows you to create multiple configurations for this task. Each configuration may contain different settings for each TCP/IP port. Each configuration has a set of TCP/IP parameters that are described below.
Each port configuration (i.e. TCP/IP connection) in Data Logger Suite can act as:
| 1. | Client. You will need to specify the remote host IP address and the port number for the TCP/IP server that you want to connect to. The IP address that you specify in Data Logger Suite when configuring it as a client may also be either a URL or the name of a computer located on your network. For example, if you want to connect to a computer named "Plant1", you can simply enter "Plant1" for the IP address instead of the actual IP address. If you are configuring Data Logger Suite as a client and your network is set up to assign IP addresses dynamically to each workstation, then you may need to use the name of the computer that you want to connect to instead of an actual IP address to guarantee a connection. |
| 2. | Server. In this mode you should specify the IP address of the local computer will be used and you only need to specify the port number that you would like to use. If your computer has more than one network interface card (NIC) then Data Logger Suite will display a list of all the IP addresses for each NIC installed in your system so that you can select the IP Address that you want to use. In order for Data Logger Suite to act as a server, the computer that it is running on must have at least one network interface card with an IP address assigned to it. In Microsoft Windows, the TCP/IP protocol can be configured to automatically obtain an IP address from a host computer. It means that your computer may not have an IP address until it is connected to a network server or a host computer. You may need to contact your network administrator to assign an IP address to your computer if you wish to configure a TCP/IP server connection. This is done in the network settings for the TCP/IP protocol in your control panel. |
After you enter the parameters that you would like to use, you must click the "OK" button to establish a connection between Data Logger Suite and the TCP/IP port. If the current port configuration is set up as a client, it will immediately try to establish a connection to the specified remote server. If the server is not available, Data Logger Suite will continually try to establish the connection until it is successful. If the port configuration is set up as a server, it will listen on the specified port until a client establishes a connection to it.
If one or more ports are configured already, then Data Logger Suite is opening these ports and starting logging. If the port is opened successful, then the status bar in the main window displays a status of this port (fig. 1.1.1). However, before you should configure port parameters that are described below.
You can create the new configuration by clicking the "Plus" button in the main window (fig. 1.1.1) or through the "Options" menu. After you clicked the "Plus" button, the dialog window will be opened (fig. 2.2.2). The dialog window contains few sections with parameters. The "IP settings" section is described in this chapter.
To log data from more than one TCP/IP connection, you would create and configure multiple port configurations. You can manage the configuration created with a drop-down menu near the "Plus" button (fig. 2.2.1).
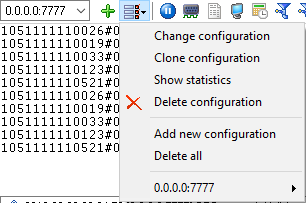
Fig. 2.2.1 Access to the port configuration
The "IP settings" tab contains indispensable settings of any TCP/IP port: IP address and port.
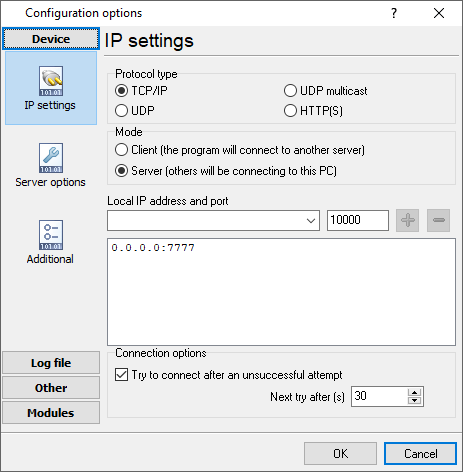
Fig. 2.2.2 TCP/IP parameters
Port
In addition to the IP address, you should specify how to connect to a remote machine. Our software can be thought of as a trunk line with thousands of individual lines (the ports) which are used to connect machines. Some ports are considered well-known ports. For example, the port typically used for network mail systems (SMTP) is port 25, the telnet port is port 23, the network news server port (NNTP) is typically port 119, and so on. To see a list of well-known ports, inspect the SERVICES file in the Windows directory (for Windows NT it is in the WINNT\SYSTEM32\DRIVERS\ETC directory). The SERVICES file is a text file used by Data Logger Suite to perform port lookups (which return the service name for the specified port) and port name lookups (which return the port number for the specified service name). You can open this file in any text editor to see a list of port numbers, and their corresponding service names. While these well-known ports are not set in stone, they are traditional and their use should be reserved for the service which they represent. When writing network applications, you should select a port number that is not likely to be duplicated by other applications on your network. In most cases, you can choose a port number other than any of the well-known port numbers.
The IP address and port number are used in combination to create a socket. A socket is first created and then is used to establish a connection between two computers. How the socket is used depends on whether the application is a client or a server. If an application is a server, it creates the socket, opens it, and then listens on that socket for computers trying to establish a connection. At this point, the server is in a polling loop listening and waiting for a possible connection. A client application, on the other hand, creates a socket using the IP address of a particular server and the port number that the server is known to be listening on. The client then uses the socket to attempt to connect to the server. When the server hears the connection attempt, it wakes up and decides whether or not to accept the connection. Usually, this is done by examining the IP address of the client and comparing it to a list of known IP addresses (some servers don’t discriminate and accept all connections). If the connection is accepted, the client and server begin communicating, and data is transmitted.
Connection options
If the remote server (in the client mode) or local network interface (in the server mode) is not available and the "Try to connect after unsuccessful attempt" options is True, then Data Logger Suite will continually try to establish the connection until it is successful. The program will try to establish the connection every N seconds that you can specify in the "Next try after XXX seconds" field.
Allowed IP addresses
This option is active in the server mode and allows you to enter one or more IP addresses that have access to the server. The server refuses connections from any other IP address. This option is very useful if you transfer your data over an Internet connection or your server computer is connected to a big corporate network. You can specify multiple addresses - one per row. If you do not specify any address here, then Data Logger Suite will accept connections from all IP addresses.
Firewall settings
After you install Microsoft Windows XP Service Pack 2 (SP2), our Data Logger Suite may not seem to work. Windows Firewall, enabled by default, blocks unsolicited access to your computer via the network and may be blocking the normal operation of the program. To provide increased security to Windows XP users, Windows Firewall blocks unsolicited connections to your computer. When Windows Firewall detects incoming network traffic that it does not recognize, a Security Alert dialog box appears. The security alert dialog box looks like this:
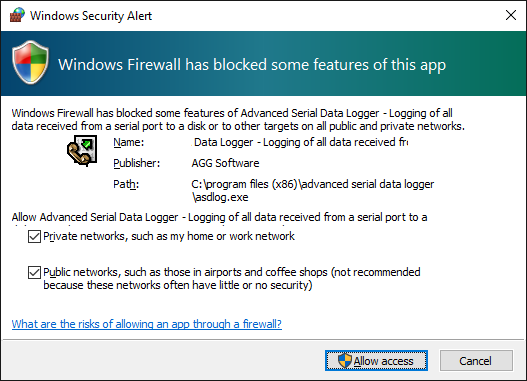
Fig. 2.2.3 Firewall alert
The dialog box includes the following buttons:
•Unblock this program.
•Keep Blocking this program.
•Keep blocking this program, but Ask Me Later.
For our program to function properly, you must unblock the program by clicking the Unblock button. Unblocking allows Windows XP SP2 to allow the program to continue to work by adding it as an exception to your Windows Firewall configuration. Exceptions are specific programs and processes that you allow bypassing the firewall. After you add a program as an exception, you no longer receive the security alert. If you choose to continue blocking the program, certain functions will be disabled.
Note: If you are using another firewall software, then please, refer to a firewall manual for corresponding settings.
Limitations
The specific limit of connections is dependent on how much physical memory your server has and how busy the connections are:
The Memory Factor: According to Microsoft, the WinNT and successor kernels allocate sockets out of the non-paged memory pool. (That is, the memory that cannot be swapped to the page file by the virtual memory subsystem.) The size of this pool is necessarily fixed, and is dependent on the amount of physical memory in the system. On Intel x86 machines, the non-paged memory pool stops growing at 1/8 the size of physical memory, with a hard maximum of 128 megabytes for Windows NT 4.0, and 256 megabytes for Windows 2000. Thus, for NT 4, the size of the non-paged pool stops increasing once the machine has 1 GB of physical memory. On Win2K, you hit the wall at 2 GB.
The "Busy-ness" Factor: The amount of data associated with each socket varies depending on how that socket's used, but the minimum size is around 2 KB. Overlapped I/O buffers also eat into the non-paged pool, in blocks of 4 KB. (4 KB is the x86's memory management unit's page size.) Thus, a simplistic application that's regularly sending and receiving on a socket will tie up at least 10 KB of non-pageable memory.
The Win32 event mechanism (e.g., WaitForMultipleObjects()) can only wait on 64 event objects at a time. Winsock 2 provides the WSAEventSelect() function which lets you use Win32's event mechanism to wait for events on sockets. Because it uses Win32's event mechanism, you can only wait for events on 64 sockets at a time. If you want to wait on more than 64 Winsock event objects at a time, you need to use multiple threads, each waiting on no more than 64 of the sockets.
If you have more than 64 connection at a time, then we recommend creating multiple configurations in our software (the "Green Plus" button). Each configuration will use different port number and will run in a different thread. This change will allow decreasing the influence of Windows limitations.
Additional parameters
The "Additional" tab contains additional settings of a TCP/IP or UDP connection (fig. 2.2.4).
Simple terminal emulation - the program realizes the simple implementation of some terminal protocols. If this emulation is enabled, then the program will process some special commands and character sequences.
Following options are effective only in the "TCP/IP server" mode:
Limit of simultaneous connections - you can define the number of clients that can connect to the server at the same time. It allows optimizing a server load with a large number of TCP clients.
Disconnect inactive clients after (s) - if a client is connected, but didn't send or receive any data within the specified time, then the connection with this client will be closed. If you will specify "-1," then the clients will not be disconnected.
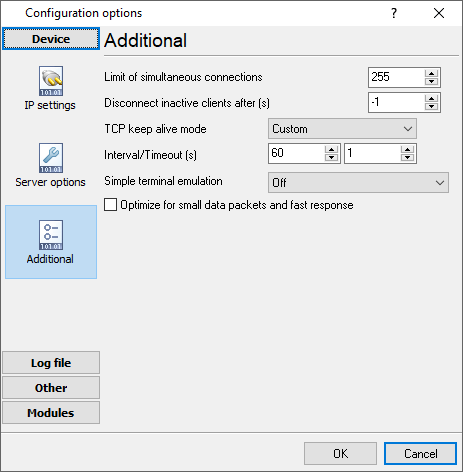
Fig. 2.2.4. Additional parameters
Following options are effective only in the TCP/IP server or client modes:
TCP keep-alive mode
A TCP keep-alive packet is a short packet which is sent periodically by the OS to keep the connection alive. The connection stays alive because those packets and their replies generate small traffic on the connection when the application is idle.
Keep-alives can be used to verify that the computer at the remote end of a connection is still available.
It is simply an ACK with the sequence number set to one less than the current sequence number for the connection. A host receiving one of these ACKs responds with an ACK for the current sequence number.
TCP keep-alive can be sent once every KeepAliveTime (defaults to 7,200,000 milliseconds or two hours) if no other data or higher-level keep-alive have been carried over the TCP connection. If there is no response to a keep-alive, it is repeated once every KeepAliveInterval seconds. KeepAliveInterval defaults to 1 second. Some (buggy) routers may not handle keep-alive packets properly.
Our software supports three modes of keep-alive (fig 2.2.4):
1. Off - the program doesn't use the keep-alive feature at all. You can disable it if your network is very stable or your routers do not support it.
2. System - the program will use the keep-alive feature, but use system values of KeepAliveTime and KeepAliveInterval. These values are stored in the following registry branch:
[HKEY_LOCAL_MACHINE\System\CurrentControlSet\Services\Tcpip\Parameters]
KeepAliveTime (32-bit number) = milliseconds
KeepAliveInterval (32-bit number) = milliseconds
3. Custom - the program will use keep-alive, but you can specify your values of KeepAliveTime and KeepAliveInterval, that are more applicable for your network and system. Note: in our software, you should define these values in seconds.
Note: Some routers may not allow keep-alive TCP packets. In this case, the "keep-alive" function will not work.