
Log and parse data from an intellectual pressure measuring device
Pressure data logger
We require software that can log data from an intellectual pressure measuring device from Paroscientific Inc into our data acquisition system. Paroscientific is the leader in the field of precision pressure measurement, resolution of better than 0.0001%, and typical accuracy of 0.01% are achieved even under difficult environmental conditions.
When Data Logger receives the information from the serial port, he adds a date and time stamp.
We are using the Digiquartz ® pressure instrumentation. The RS-232 interface user manual for intelligent pressure devices exists on a corporate web-site.
Short hardware overview
Digiquartz ® Intelligent Transmitters, Portable Pressure Standards, Intelligent Depth Sensors, MET stations, and Water Stage Sensors consist of a standard Paroscientific pressure transducer and a digital interface board in an integral package. The digital interface boards are also available separately for customer systems where separate packaging of the transducer and interface board is desired.
Programming and operation are the same in all configurations. The digital board has a microprocessor-controlled counter and RS-232 port. The microprocessor operating program is stored in permanent memory (EPROM). The device stores all user-controllable parameters in user-writable memory (EEPROM). The user interacts with the unit via the two-way RS-232 interface.
The microprocessor monitors incoming commands from the computer. When a sampling command is received, the microprocessor selects the appropriate frequency signal source and makes a period measurement using a 14.74 MHz timebase counter. The counter integration time is user selectable. Some commands require measurements of both temperature and pressure signals. In that case, the temperature period is measured first, followed by the pressure period. When the period measurement is completed, the microprocessor makes the appropriate calculations and loads the data onto the RS-232 bus.
Short protocol overview
All commands have the form: *ddsscc__<cr><lf>
- Data framing is 8 data bits, no parity, one stop bit, or 7 data bits with even or odd parity, one stop bit. Set by command PT.
- Each line starts with an asterisk (*).
- The next two digits, dd are the destination for the command (00-99). The controller (IBM PC, etc.) has the address 00, and the transmitters can be 01 through 98. Address 99 is for "global". A transmitter responds only to its address or 99.
- The next two digits, ss, are the source of the message (00-98).
- The next two characters, cc, specify the type of message and may be followed by more characters in some messages. Characters must be upper case. Reply messages may substitute data for the cc characters.
- Each message line is terminating by a carriage return <cr> and a line feed <lf>.
- Undefined commands are absorbed.
- If command arrives before a previous command is completed, it cancels the previous command.
A typical message from the PC to transmitter #1 asking for pressure: *0100P3 <cr> <lf>
A typical reply from the transmitter to the PC: *000114.573 <cr> <lf>
Requirements:
- Data Logger Suite Professional, Enterprise, or a trial version;
- ASCII Data Query and Parser
It is assumed that:
You know and can configure communication parameters (baud rate, the number of data bits, flow control, etc.) in the logger.
Solution:
Thanks to Paroscientific for a detailed description of the RS-232 protocol. The description above shows that a data flow contains non-printable characters (CR and LF). If you want to look at it, please, set the following options. The option in the pos.3 allows you to identify request, which the logger will send to a device.

Fig.1. Pressure data logger. Serial data view setup
Now, click the "OK" button and try to receive data from a serial port. Nothing? Sure, the protocol specification says that a pressure device requires a request from a computer's side. OK. It's simple. We should configure additional modules. First, please, select the "ASCII data parser and query" plug-in from two drop-down lists (fig.2a, pos. 1 and 2). Then, enable a parsing option for data received (fig.2a, pos. 3) and select necessary data export plug-ins. The DDE server (fig.2b, pos. 3) will help to check the accuracy of the parser's configuration. The "Local database" plug-in (fig.2b, pos. 4) will create Microsoft Excel files.

Fig.2a. Pressure data logger. Data query and parser plug-ins.

Fig.2b. Pressure data logger. Data export plug-ins.
Now, please, open the ASCII query configuration window (click the "Setup" button near a first drop-down box on pic.2a, pos.1). The dialog window will appear on the desktop (fig.3).

Fig.3. Pressure data logger. Data query.
The window allows you to add one or more requests at the same time. All available requests (fig.3, pos.1) are listed in the requests list (fig.3, pos.4). Each request has several properties: the request data (fig.3, pos.2) and the request interval (fig.3, pos.3). You may edit a request by double-clicking over the request in the list.
Any new requests may be added by clicking the "Add request" button (fig.3, pos. 5). The new dialog window will appear over the previous window (fig.4)
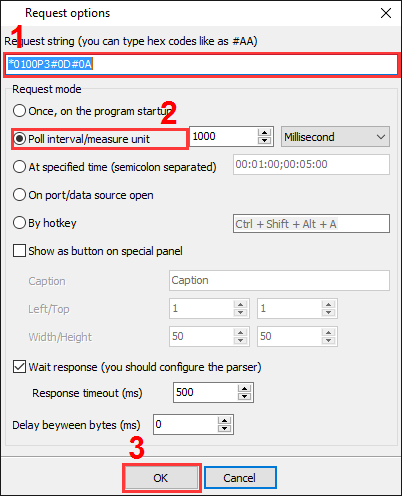
Fig.4. Pressure data logger. Data query parameters.
The request properties:
- Request string (fig.4, pos.1) - simple type the request string from the specification above and add hexadecimal codes of termination characters CR and LF at the end of the request. Each hexadecimal code should contain the "#" prefix character;
- Poll interval (fig.4, pos.2). - the module will send a new request after a specified interval. In this example, the module will poll our pressure measuring device every second for a new value;
- At the specified time - you should specify a time of a day when the program will send the request;
- Wait response - the program will not send a new request until a response received within this interval.
Click the "OK" button in this dialog window. The module will add a new item to the requests list (fig. 3, pos.1).
Note: You can add a byte with any code to a request. For example, if you want to send byte with the 0x02 hexadecimal code to a device, type the #02 string. If you're going to send the "#" character, then you should type it twice.
Please, open the next page (fig.5) by clicking the "Parser" button. Then click the "Data packet" button.

Fig.5. Pressure data logger. Parser configuration window.
On this page, you should specify the framing characters of a data packet. Field #1 is the data packet's start ("*" in this example), and field #2 is the data packet's end (#0D#0A in this example, same as in the request above). You should also specify a timeout value in field #3, which the plugin uses if it cannot receive ending characters, and it should wait for a new data packet. You can also easily add a datetime stamp to each data packet that the parser will process. Just enable the "Add date/time stamp" option in the pos.4.
The next page (fig.6) is a significant part of the parser configuration. The data parser uses this information for data extraction from the data packet. The data packet from this example contains only one data item, which should be placed into one variable. Later, this variable (a pressure value) will be used in a data export module and placed in a column of a database.

Fig.6. Pressure data logger. The parser item.
Any new items may be added by clicking the "Add item" button (pic.6, pos. 7). Before adding an item, the program will ask you about an item description. You can type any characters here, which will help you to remember a variable's content. For this example, one variable with a corresponding description has been added.
Each parser item has some properties:
- Item name. This name will be bound to a column in the data export plug-in. It is a limited text description and cannot contain spaces and a few other characters;
- Parser's type. It is a method which the program will use for data extraction. Our parser has a few methods from simple to the most powerful. In this example, where data is being placed in fixed place, we can use the simple method - fixed position. This method allows the extraction of any number of characters from any fixed position of the data block;
- Data type. It is the data type of the characters extracted. You can specify several data types. The data will be converted from the "String" data type to the conversion type. In this example, the "Pressure" item has the "Float" data type;
- Default value. The value specified here is to be used when data cannot be extracted from a data block;
- Fixed position. It is the position of the first variable's character in our data block. The minimum value is 1;
- Fixed length. It is the number of characters, which will be transferred to a variable. The minimum value is 1.
Other options (on other pages) are unnecessary in our case because we don't need to filter our records and our data type doesn't require additional format options.
We are now ready to configure the data query and the data parser modules. Click the "OK" button in the configuration window. Connect your device and power it on if necessary. You should get something like the image below.

Fig.7. Pressure data logger. Data received.
It's another view of the received data. All non-printable characters have been replaced with their code like #0A or #0D. The yellow color has highlighted the requests.
If the parser has been configured correctly, then in the DDE server window, you'll see our variables' names and values (fig.8).
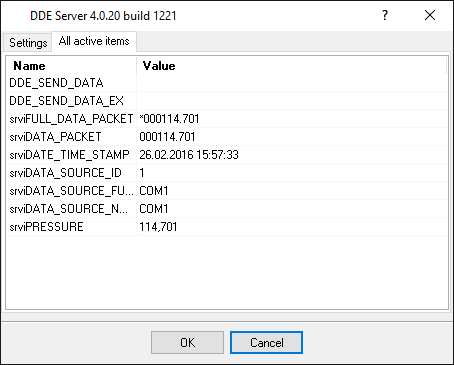
Fig.8. Pressure data logger. DDE server window.
All parser items are now ready for export to any database, Microsoft Excel, or Microsoft Access.